by hankinslawrenceimages | Jul 22, 2008 | Photo Tips

Scott’s Run Falls (c) 2006 William Lawrence
After we posted our blog post on 10 Tips for Photographing Waterfalls, we got a couple of requests for more information about tip 1 – Shutter Speed. Since we’re photographers – the easiest way for us to explain the concept is with photos!
These are some photos Bill and I took in Virginia where Scott’s Run meets the Potomac River a couple miles down stream from Great Falls. We placed the camera on a tripod and set the ISO to 100 for all the photos. We used shutter priority mode on the camera to control the shutter speed.
As you’ll see, in the photos with the faster shutter speeds you can see some of the individual water drops. The slower the shutter speed – the more creamy and flowing the water looks.
Shutter speed 1/50 of a second.

(c) 2005 Patty Hankins
Shutter speed 1/10 of a second

(c) 2005 Patty Hankins
Shutter speed 1/2 of a second

(c) 2005 Patty Hankins
Shutter speed one second

(c) 2005 Patty Hankins
Shutter speed 6 seconds. Bill used a polarizer filter to slow the water even further for this photo.

(c) 2005 William Lawrence
I hope these photos help explain how you can affect the way your waterfalls photographs will look by choosing your shutter speed.
by hankinslawrenceimages | Jul 13, 2008 | Photo Tips
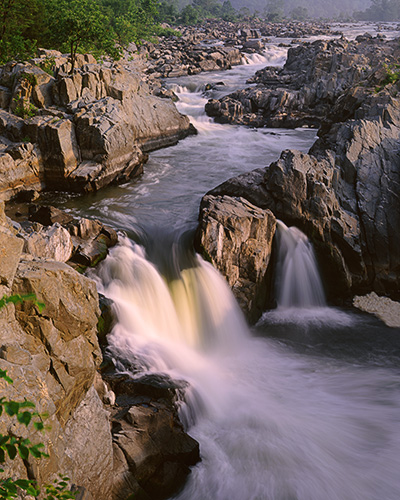
Great Falls II (c) 2005 William Lawrence
One of Bill’s and my favorite types of landscapes to photograph are waterfalls. If you’ve had a chance to check out our website, or have seen our booth at one of our shows, you have probably already figured out that we love waterfalls and that Great Falls on the Potomac River is one of our favorite sets of falls.
Bill took the photo at the top of this post from the second overlook at Great Falls National Park in Virginia. I love the way the light makes the rocks glow in this photo. To capture the light, Bill went out to Great Falls early on a Saturday morning to figure out how long after sunrise the light hits the rocks. The next morning, he was there, all set up and ready with his large format camera to take the photo just as the sun rose about the ridge line.
As we’ve built our collection of waterfall photographs, we’ve made a few (ok, more than a few) mistakes and learned a few things. Here are a few tips that we hope will help you take great waterfall photos of your own.
1. Shutter speed is important in waterfall photography! Tastes vary in how people like to see the water flowing over waterfalls presented in a photograph, but we prefer using a slower shutter speed for a motion effect to the water. A fast shutter speed will show individual waves and droplets in the water, but a slower shutter speed actually shows the path that the water travels – the slope of the water off the fall, the arcs of the water as it splashes off a rock on the way down the falls. For us, this makes a more interesting picture. Typically, we’ll try for a shutter speed of ½ to 1 second if we can, but will try to at least keep the shutter slower than 1/15 of a second.
2. ISO matters. To keep the shutter speed slow, we use a low ASA film (we often use 50 ASA) or set the ISO on the digital camera as low as it will go (usually 100).
3. Use filters if you have them. If the light is bright enough, we may not be able use the shutter speed we want to. When this happens we use either a neutral density filter or a polarizing filter can be used to drop the shutter speed.
4. Use a tripod. With slow shutter speeds, you will need a tripod to steady the camera. Also, remember that with a shutter speed this low, anything moving in the picture other than the water (e.g. people, foliage blowing in the wind) will also be blurred.
5. Make sure the camera is level. A photograph of water that appears to be flowing uphill is very disturbing. I really try to remember to use my bubble level – and to make sure it is level for my waterfall photos. I’ve deleted more waterfall photos than I care to remember of water running uphill in the picture.
6. Direction matters. Remember to check the direction of the falls, to determine the best time of day for light hitting the falls to give the most dramatic photograph. Great Falls is best photographed in the morning.
7. Seasons matter. Check out the falls in different seasons, e.g. does it look best with new spring foliage? Best in the fall with the leaves turning? Some other time? Since spring and fall tend to be the wettest times of the year, these are usually good times to catch falls at their peak levels.
8. Research before you go. Learn what you can about the falls, and what you’ll need photographically, before you get there. If you know that name of a waterfall you want to photograph, search for it on Google. Chances are someone has posted information about photographing that set of falls somewhere on the web.
9. Be prepared to do some hiking. Most of the waterfalls we have been to involve some hiking in hilly terrain (it is tough to have a waterfall over perfectly flat land). So don’t forget comfortable hiking shoes for the trail, a water bottle (especially in hot weather), sunscreen and bug spray.
10. Takes lots of photos at various exposures. You may be surprised at what you discover what your preferences for waterfall photography are.
If you’ve got any tips for taking photos of waterfalls, please add them below as a comment. We’d love to hear your tips.
by hankinslawrenceimages | May 28, 2008 | Photo Tips
Recently, Bill has been doing some experimenting with digital infrared photography. Infrared photography can give an “otherworldly” look to your photographs. Foliage tends to reflect infrared, so leaves, grass and such tend to be near white. Still water and clear skies go quite dark, but clouds remain light. Below is a photo of a waterfall at Olmsted Island at the C&O Canal National Park in Maryland (this is on the path to Great Falls at the park – usually there is only a trickle of water here but the waterlevel was quite high when he took this recently). The leaves are the brightest objects in the picture, and the water before the falls is quite dark.

Falls Alongside Olmsted Island (c) 2008 William Lawrence
The sensors on most digital cameras are sensitive to light beyond what the human eye is sensitive to. The result is that the sensors can “see” a broader spectrum of light than the eye can. To keep this from interfering with photographs, camera manufacturers place a filter over the sensors to block out most of the light outside of the visual range.
However, some of the older Digital SLRs are still sensitive to near infrared light, which is not visible to the naked eye. A quick test of this on your camera is to take it into a darkened room with a TV remote control (most work with infrared light). Point the control at the camera and take a picture while activating the remote control. If you see light on the photo, you camera is capturing infrared light and displaying it in the visual spectrum so that you can see it.
Bill tried this with our old Canon D30 (note not a 30D – this is one we got in 2000) and found that it was sensitive to infrared light. He converted it for digital infrared photography by getting an infrared filter for it (a Cokin P007 infrared filter). You can’t see through the filter, so all composing has to be done before you put the filter on the camera. Also, while the camera does capture light in the near infrared spectrum, most of it is blocked. Most of Bill’s exposures were in the range of 3-10 seconds at f11 at ISO 400 in broad daylight.
Infrared can make an interesting addition to your photographic techniques. Bill is getting a DSLR modified specifically for infrared photography – more on this once we get the camera back and have a chance to use it.
In the meantime – here’s one more infrared photograph taken at Great Falls. This time from the Virginia side of the Potomac River in the Great Falls National Park.

(c) 2008 William Lawrence
If you’d like to see some of Bill’s digital infrared photography in person – please stop by our booth at one of our shows.
by hankinslawrenceimages | Mar 27, 2008 | Camera Collection, Photo Locations, Photo Tips, Washington DC
In an earlier post, we explained how Bill used a view camera to help achieve his vision by setting the focus along the entire section of the Vietnam Wall, getting everything he wanted in focus. In this post, we will explain how he used the movements on the view camera to get things he didn’t want out of focus.
Below is our photo “Lone Sailor” of the Lone Sailor statue at the US Navy Memorial. This memorial was one of the most challenging memorials in the Washington DC area to photograph. It took us several trips exploring the monument and taking various test photos before we were able to plan the photos we wanted to take.
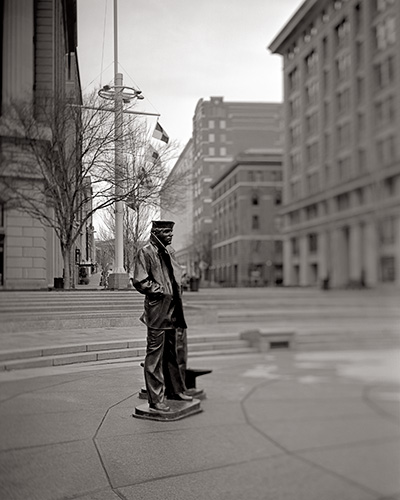
Lone Sailor (c) 2008 William Lawrence
At first glance, the Navy Memorial doesn’t seem that hard to photograph. A closer look reveals that it sits in the middle of downtown Washington, DC. Surrounded by buildings, the memorial has several major elements, including the sailor statue, the ships mast and several walls spread out over a plaza. At certain times of the day, a neon deli sign is visible just over the sailor’s shoulder.
Getting the sailor statue and one of the surrounding masts from the memorial into the photo isn’t really difficult, but getting these elements without a bunch of distracting elements (the surrounding buildings) is essentially impossible since the statue is surrounded by buildings, as shown in figure 1 below. To get a good view of the statue, including the face of the sailor, the surrounding buildings are going to be in the photo.
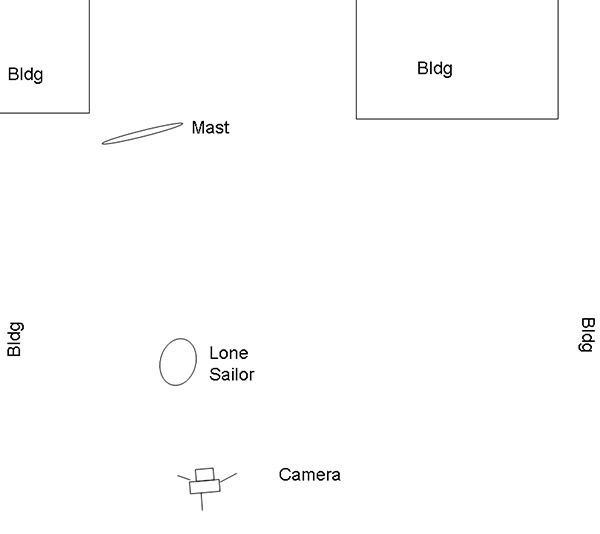
Figure 1 (not drawn to scale)
The human eye is naturally drawn to items in a photograph that are in sharp focus, and tends to pass over out of focus elements. By using a large amount of swing in the view camera on both the front and rear standards of the camera, Bill was able to set the plane of focus so that the sailor statue and mast were in focus, and the building were out of focus. (See Figure 2)
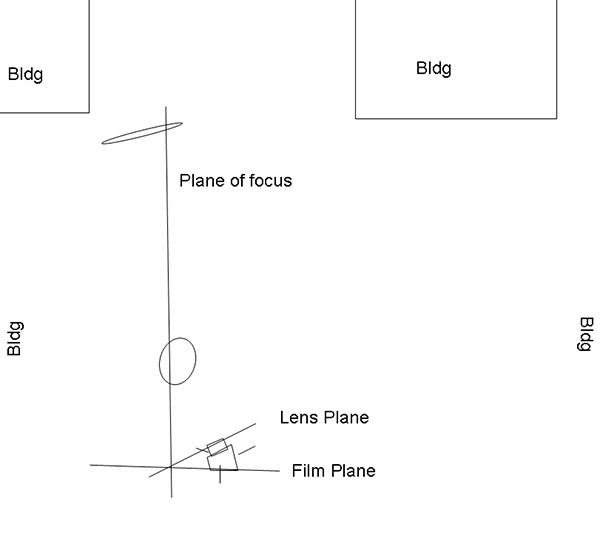
Figure 2 (not drawn to scale)
In addition to using swing on the camera, Bill used a large aperture (small f-stop number) for very narrow depth of field. The narrow depth of field ensured that everything except the statue and the mast were out of focus (you can see this more on the buildings to the right than to the left, but it is present on both sides). Instead of being a set of distracting elements in the photograph, drawing your eye away from the memorial, the out of focus buildings fade into the background as unobtrusive compositional elements, drawing the eye to the memorial.
The combination of the narrow depth of field and use of the movements on the view camera allowed Bill to achieve his vision of a photograph emphasizing the memorial within its cityscape environment.
by hankinslawrenceimages | Mar 10, 2008 | Flowers, Photo Locations, Photo Tips, Washington DC
It’s almost that time of year again! The metropolitan Washington, DC area goes a little crazy during cherry blossom season. Each year, over 3,700 cherry trees around the Tidal Basin near the Jefferson Memorial, East Potomac Park, and the Washington Monument grounds come into bloom sometime in late March to early April. At peak bloom, the path around the Tidal Basin looks like it is lined with puffy pink and white clouds. It really has to be seen to be believed. It is well worth the trip, and don’t forget your camera!
In our opinion, the best place for photography during peak bloom is around the Tidal Basin. But, that being said, it is worth exploring the area around this park, because there are many other great views! The most popular shot people try for is the Jefferson Memorial framed by cherry blossoms from across the Tidal Basin. We head down to the Tidal Basin every year to see the blossoms, and are always amazed at how many photographers and media personnel are there early in the morning.
If you’re planning on coming to DC to photograph the blossoms, we have a few tips that may help you get the photos you are hoping for:
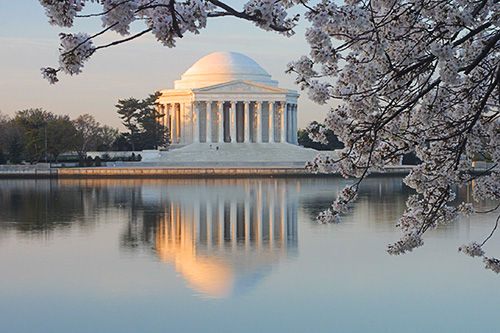
Jefferson Memorial with Cherry Blossoms (c) 2002 William Lawrence
1. As with many landscape subjects, early morning or late evening tends to be the best time, because of the warm tone
and the low angle of the sunlight. Our photograph of the Jefferson Memorial framed by blossoms was taken right as the sun was rising. For the early birds, it is best to arrive before sunrise since there will be lots of other people trying to photograph the blossoms and Jefferson Memorial in the early morning light.
2. If you do want to take sunrise photos, you will want to bring a tripod for your camera. That way you can take longer exposures without having to worry about holding your camera perfectly still. So far, we’ve never had a problem using a tripod around the Tidal Basin.
3. If you want to park in the public lot adjacent to the Tidal basin near the Jefferson Memorial, coming before or shortly after sunrise is about the only time you have a reasonable chance of finding a parking space. After that, you take your chances during peak bloom. If you are planning on driving, check out the suggested parking for the Jefferson Memorial from the National Park Service for suggestions for other places to park.
4. The Tidal Basin area is a moderate walk from the Smithsonian Metro station, so this is a good option unless you want to be there before sunrise (Metro does not start running until 5:30 AM on weekdays, 8:00 AM on weekends). The Smithsonian Metro station is on the Orange and Blue lines.
5. Plan on taking lots of photos. This means bring plenty of film or storage media for your digital camera. Experiment with shots from different angles. Also, remember you are shooting white blossoms (and with the Jefferson Memorial, a near-white building) that can fool your light meter, so bracketing your exposures or using exposure compensation manually may help to ensure that you get the perfect shot.

(c) 2002 William Lawrence
6. Everyone has their own style of shooting, but we’ve found a wide angle lens and a moderate telephoto lens to be
helpful. Our Jefferson Memorial photo was taken with a zoom lens at a 35mm film equivalent of a 100mm lens.
7. Be prepared to see and be seen. Typically, by late morning the Tidal Basin area is packed. It’s also a great chance to see
what equipment other photographers are using. You’ll also see amazing picnic set ups, dogs of every breed, and the occasional formal tea ceremony.
8. Want to be there before sunrise, but don’t know when sunrise is? Download a copy of Heavenly Opportunity and it will let you know when you need to be at the Tidal Basin.
So if you get a chance, please come to DC to see the Cherry Blossoms blooming. And if you can’t make it this year –
there’s always next year!
For the most current information about the forecast for this year’s bloom and the Cherry Blossom Festival, visit the National Park Service’s National Cherry Blossom Page. As of March 8, the peak blossom bloom is forecast for March 27 through April 3. The bloom is expected to last for about 10 days. Of course – this all may change depending on the weather in the DC area over the next few weeks.
March 24 – PARKING UPDATE – The Park Service is closing the parking lot at the Tidal Basin from March 26 to April 15. More details on a temporary parking lot at Hains Point and a Shuttle Bus are in my blog post Parking for the 2008 Cherry Blossoms in Washington DC.
by hankinslawrenceimages | Mar 6, 2008 | Camera Collection, Photo Tips
In a earlier post, we talked about Bill’s favorite camera (his K.B. Canham View Camera), and why he likes using it. Since a view camera can somewhat complex to use, we decided to write a few posts on some of the interesting ways Bill has used the view camera to create the images he wanted to. If you are seriously interested in using view cameras, check out Leslie Stroebel’s book, View Camera Technique.
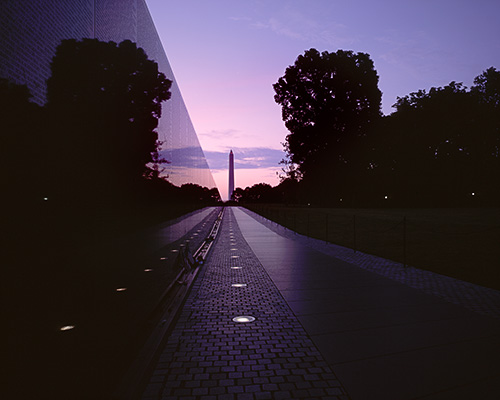
Bill’s photograph of the Vietnam Wall at Dawn is one of his best examples of how he used the view camera to create an image with specific qualities. The photograph was taken right before sunrise, shooting along the east side of the Vietnam Wall with the Washington Monument in the distance.
The layout Bill used for the photograph (not to scale, our PowerPoint skills are not that good) is shown in Figure 1. Essentially, the camera mounted on a tripod is set to shoot along the wall, while keeping the Washington monument in the field of view.
Figure 1
Figure 2 illustrates what you get when you use an SLR or point and shoot camera. With this type of camera, the plane of the lens is parallel to the plane of the film (or sensor in a digital camera). The plane of sharpest focus (what you focused on) is also parallel to the film. Everything in the plane of focus will be in sharp focus. The further you move away from the plane of focus, objects will appear more out-of-focus in the photograph.
If you were going to recreate Bill’s photograph using an SLR, the challenge is how do you keep both the closest part of the Wall and the Washington Monument in focus? You can do it to some extent by using a very small aperture to get large depth of field, but even that has its limitations.
Figure 2
With a view camera – the lens plane and the film plane don’t have to be parallel. You can use camera movements to angle the film plane and the lens plane to change where the plane of focus will be. When done horizontally, the angling is known as “swing”. Done vertically it is known as “tilt”.
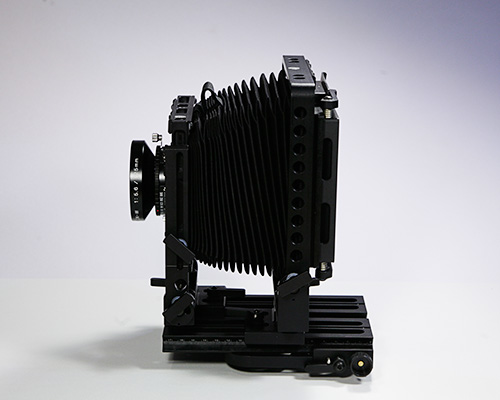
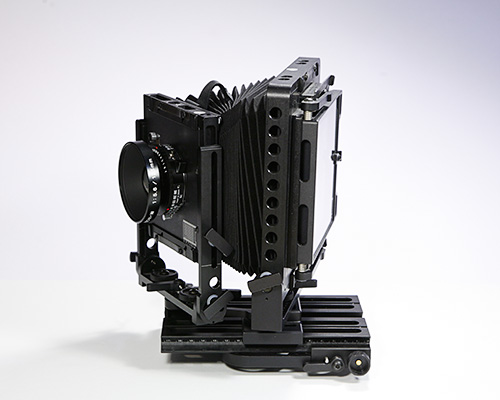
Below are two photos of the Canham. The first is with the lens plane parallel to the film plane (so similar to your standard camera in terms of the plane of focus), and the second shows the camera set for both front and rear swing. This is a more exaggerated swing than Bill used for the photo.
Lens plane parallel to the film plane
Lens plane at an angle to the film plane
When the lens and film planes are no longer parallel, the plane of focus isn’t parallel either. This effect is known as the Scheimpflug principle (after Theodor Scheimpflug – an Austrian Army Captain). For his photograph of the Vietnam Wall, Bill applied primarily front and a little rear swing to change the plane of focus. As shown in figure 3, the entire wall and the Washington monument are in focus.
Figure 3
If you look at the original transparency for this photograph with a loupe, you can make out individual letters on the Wall on the first four panels. You can also read the letters on a very large print. If you stop by our booth at a show when we have the 22″X28″ framed version of The Wall at Dawn displayed, you’ll be able to read the names for yourself.
For many photographs, camera movements such as swing aren’t necessary. However, in certain circumstances, they are necessary to achieve your vision. Without the ability to swing the plane of focus, Bill’s The Wall at Dawn would be a nice photograph. With the swings – he was able to achieve your vision of a spectacular image with both the Wall and the Washington Monument in focus.


