by hankinslawrenceimages | Sep 8, 2017 | Photo Tips
One of the things I love about photographing with a digital camera is the instant feedback! By taking a quick (or not so quick) look at my photo on the back of my camera, I know immediately if I captured the image I wanted, or if I need to try again. No more of the taking a photo, having to wait to finish a roll of film, sending it off to be developed, and getting prints back before knowing if you captured the image!
So I thought I’d share with you the top three things I look for when I’m reviewing my photos in the field.
The first thing I look at is my composition. Have I included what I want in my photo? Excluded what I don’t want?
If I’m photographing using my tripod, I check the composition before taking my camera off the tripod or moving my tripod – that way if I need to adjust my camera to get the composition I want, I know EXACTLY where my camera was for the first photo.
The second thing I look at is the exposure. Is my photo exposed correctly? Is it over-exposed? Is it underexposes? Do I have the correct depth of field?
On all my cameras, I keep the “blinking highlights” turned on. That way if my selected settings mean that if I have areas in my photo that my camera thinks are over-exposed, I know it. Then I can decide if I need to change my settings and retake the photo.
The final I look for are the things that are in the photo that shouldn’t be – and that despite looking through the viewfinder I never saw. It’s amazing what I can miss in the viewfinder – that I see when I review my photos. Some of my “OOOPS!” include
My finger, my diffuser, my tripod shadow
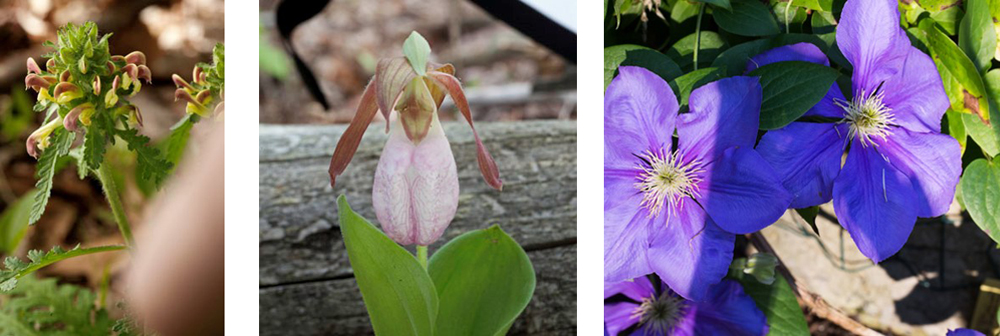
And, my camera strap!
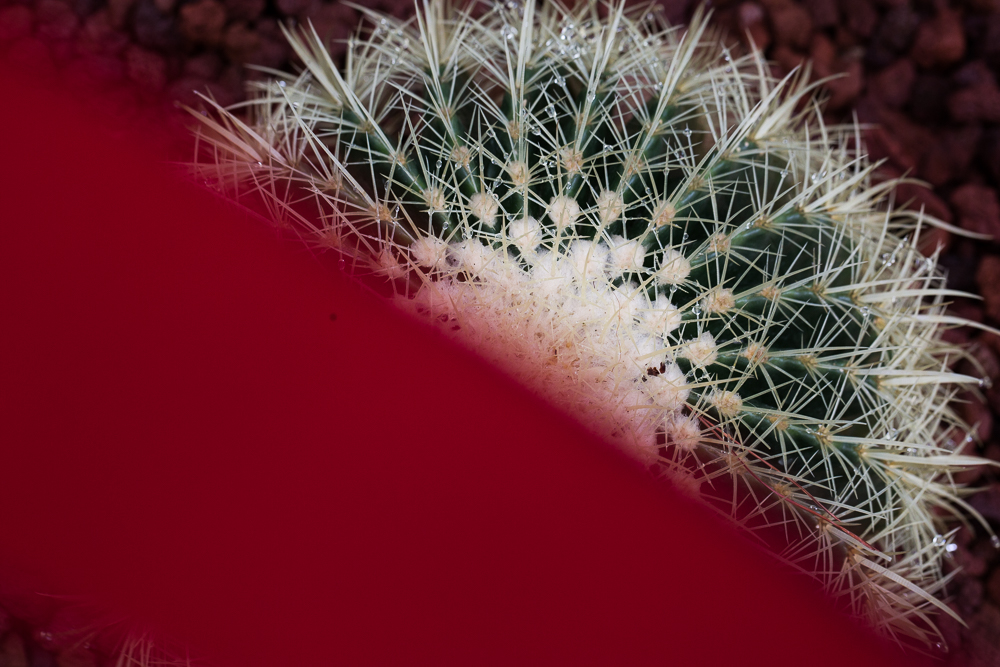
So now you really see why I make sure I review my photos in the field!!!!!
Reviewing your photos in the field is one of the skills Bill and I teach in our photography workshops. If you find this type of tip helpful, please join us for our Autumn Morning on the Soleado Lavender Farm Workshop on October 14. You can find more information about the workshop on my website at http://beautifulflowerpictures.com/autumn-morning-soleado-lavender-farm-photography-workshop/
by hankinslawrenceimages | Jul 21, 2017 | Photo Tips
One of the questions I get on a regular basis is how do you photograph flowers when the wind is blowing? Most people seem to want to photograph flowers that are standing still. So they get frustrated on windy days – especially if they only have that one visit to try to photograph some specific flowers.
I have a couple of suggestions for how to photograph flowers when the wind is blowing.
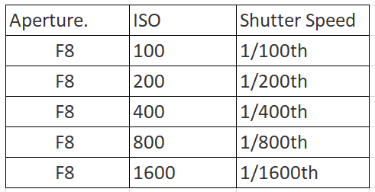
The first is to try to stop the motion by increasing your shutter speed. If you are photographing in Aperture Priority and know what aperture you want to be using, take a photo at that aperture and see what you get for a shutter speed. If it’s not fast enough, an easy way to increase your shutter speed while keeping the same depth of field is to increase your ISO. With digital cameras, ISO can act as a third variable with aperture and shutter speed in getting the correct exposure.
So if you are photographing at f8 at ISO 100 with a shutter speed of 1/100th of a second – and that’s not a fast enough shutter speed to stop the motion of the wind, you can get a faster shutter speed by increasing your ISO. The table below shows you the different shutter speeds you can get by changing your ISO and keeping the same aperture.
As you work with your camera, you’ll discover how high of ISO you can use without encountering problems with digital noise.
If you don’t want to stop the wind, you can always embrace it and show the motion of the flowers in your photo.
One way to do that is use a slower shutter speed. So rather than increasing your ISO – try decreasing your ISO to the lowest one your camera has. Then you can close down my aperture to get a greater depth of field with a slower shutter speed. If you still don’t have a slow enough shutter speed to show the motion you want to capture, try using a polarizer filter or neutral density filter to further slow your shutter speed.
When I saw these Texas Bluebonnets and Indian Paintbrush blowing in the wind along the side of the road outside of Austin, Texas, I knew I had to stop. For my first several photos I tried to stop the motion and just wasn’t happy with my images. Then I took a moment to think about what had caught my eye – the colors moving in the wind – and I knew what I had to do! I lowered my ISO to 100 and changed my aperture to F 22 and took a few photos. They were better – but still not what I was looking for. So I pulled out my polarizing filter and put it on the front of my lens. Finally I had what I wanted – a photo that was all about color and wildflowers dancing in the wind.
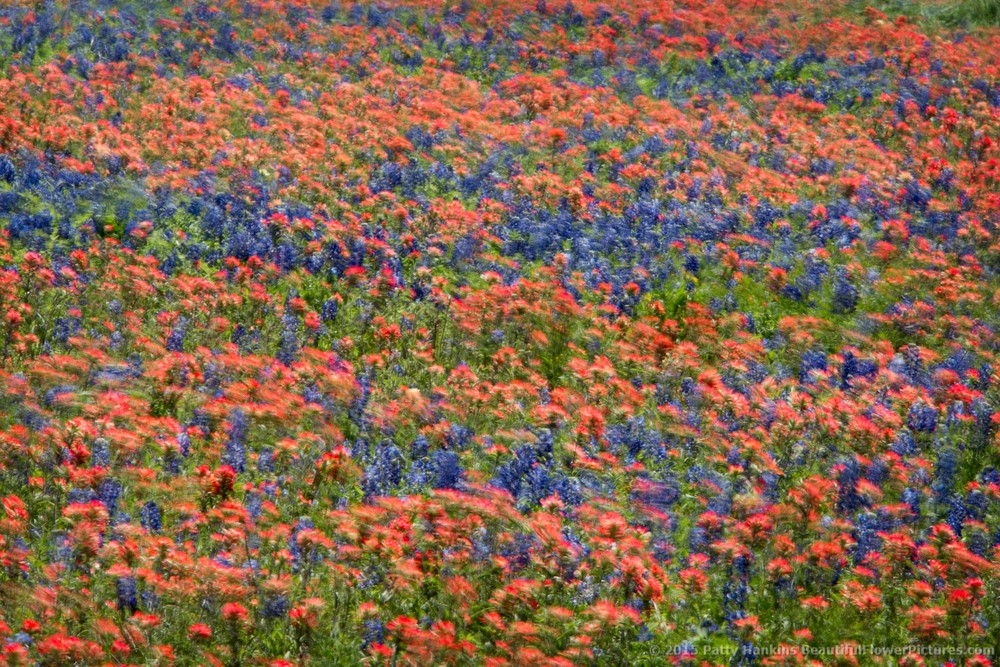
Texas Wildflowers in the Wind © 2015 Patty Hankins
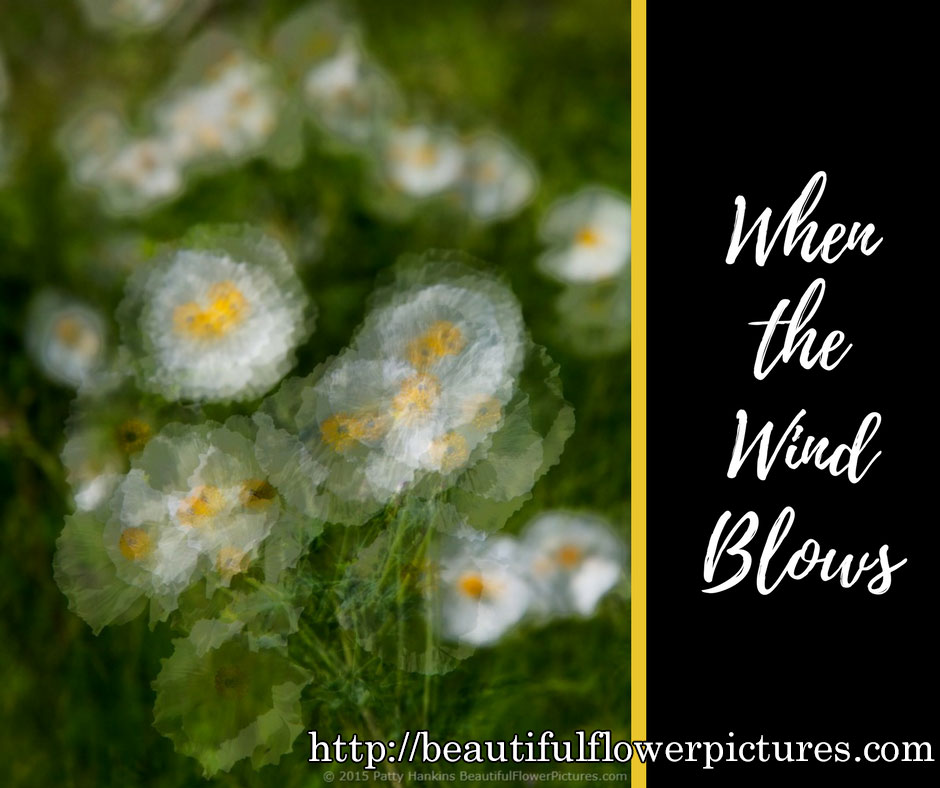
Another way to embrace the motion is to combine multiple photos of the flowers into one.
I photographed these prickly poppies the same day I photographed the Texas Bluebonnets and Indian Paintbrush (it was a really windy day!). I tried using a longer shutter speed with these wildflowers but I just couldn’t get the photo to look the way I wanted it to. So I tried a technique I’d learned in a workshop – taking multiple photos and merging them into one. So I put my camera on my tripod, focused on the flowers, set the my aperture and took about 30 photos when the flowers were moving. Then when I got back to my computer I loaded 10 of the photos into photoshop as separate layers and used my HDR software to merge them. The trick was to turn off the “auto-align” option in the HDR software. So the software just blended the layers rather than trying to align the flowers in the image – and I ended up with a composite photo that showed how the prickly poppies were dancing in the wind.
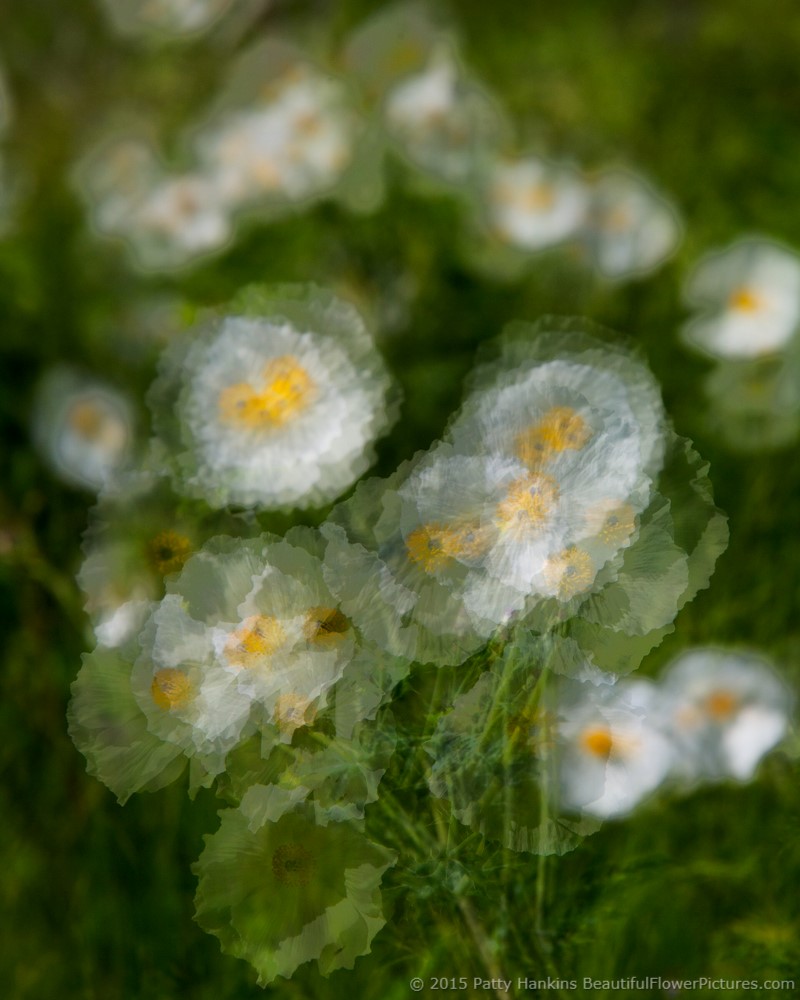
Prickly Poppies in the Wind © 2015 Patty Hankins
I hope these ideas help you get the photos you want next time you’re out photographing flowers and the wind is blowing.
If you found this information helpful, please join Bill and I for one of our DC Flower Safari Office Hours sessions. For Office Hours, Bill and I invite a small group of people over to our house to answer their questions about photography including how to use your gear, how to edit your photos, and how to photograph in specific situations. Our next office hours are on August 19th. You can learn more about office hours on Meetup at https://www.meetup.com/DC-Area-Flower-Safari/events/241199335/
And if you liked my wildflower in the wind photos – both are available for sale. You can see both of them along with other Texas wildflowers on my website at http://beautifulflowerpictures.com/store/texas/

by hankinslawrenceimages | Jun 2, 2017 | Photo Tips, Uncategorized
One of the questions I get asked on a regular basis is what software should I use to edit my photos? Should I use Lightroom or Photoshop?
My answer is – it depends. I use both at different points in my editing process. It’s really a matter of which program you are comfortable using, and what you want to do.
If you’ve never edited your photos or have been using very basic editing software, I recommend starting with Adobe Lightroom. From the beginning, Lightroom was designed for editing photographs with the input of photographers throughout the process. Once you learn the basics of the Lightroom Develop Module, editing photos is actually very intuitive. If you start at the top of the panel of editing tools and work your way down through them, you will have made a wonderful start on editing any photo you take. Lightroom also has a Library Module which helps you keep your photos organized. It also has dedicated modules for printing, creating slide show and web pages.
For many photographers, Lightroom is the only photo editing program they use.
Photoshop is one of the most powerful photo editing tools on the market. I’ve been known to refer to Photoshop as the world’s most user-hostile program.
The challenge for many photographers is that it is a very complex program. Photoshop started out as a program for graphic designers, so many of it’s tools aren’t very intuitive for photographers. With it’s array of tools, there are usually several different ways to accomplish the same goal in Photoshop, so most photographers discover which tools work for their style of editing and never learn everything the program can do.
For photographers who are want to edit their photos in ways that Lightroom isn’t designed to work or who learned on Photoshop so are very comfortable with it, Photoshop may be the only program they use.
Many photographers (including me) use both Lightroom and Photoshop depending on what they want to do with a specific photograph.
Lightroom is the starting point for every photo I edit. After I delete any photos that I know I’ll never edit (wrong focus, wrong exposure or some other fatal flaw), all the keepers get imported into Lightroom where I organize them by category so I can find them again. Then for the ones I want to edit, I head to the Develop Module and start editing. I tend to mainly do global edits (changes that affect the entire photograph) in Lightroom.
For most photos that I’ll just be sharing on the web, I do all of my editing in Lightroom. Once I’ve completed the edits I want, I just export them as JPG files, watermark them, and they’re ready to share.
If I want to do more complex edits or know that I’ll be printing a photograph, once I’ve done my basic editing in Lightroom, I export the photo to Photoshop and complete my editing there. I find it easier to do local edits (changes that affect only part of the photograph) in Photoshop using the various layers and masks. I also find it much easier to “clean up” my photos (removing unwanted objects or more likely dust spots on my sensor) in Photoshop. I also prepare my photos for printing in Photoshop.
Bill on the other hand uses Photoshop almost exclusively. He learned to use it years ago, it makes sense to him, and he finds it easier to use than Lightroom.
Bill and I will be offering a series of photo editing workshops this fall. All our editing workshops are limited to 4 participants. I know what it’s like to sit in a big room feeling lost as someone tries to explain how to edit photos on a big screen at the front of the room. I usually end up totally frustrated, since I’m still trying to figure out step 2 while they’re talking about what they’re doing in step 10! With 2 instructors and 4 students, our goal is to provide you with the individual help you need so you actually understand what you’re doing by the end of the workshop.
We’ll be teaching our Introduction to Lightroom: From RAW and JPG to Masterpieces in a Weekend on September 16-17. This workshop is really designed for people with little or no experience with Lightroom. Our goal is that by the end of the weekend you’ll know how to import your photos, do basic edits, and export them for print or the web. You can read more about our Lightroom workshop at http://beautifulflowerpictures.com/intro-lightroom-raw-jpg-masterpieces-weekend-2017
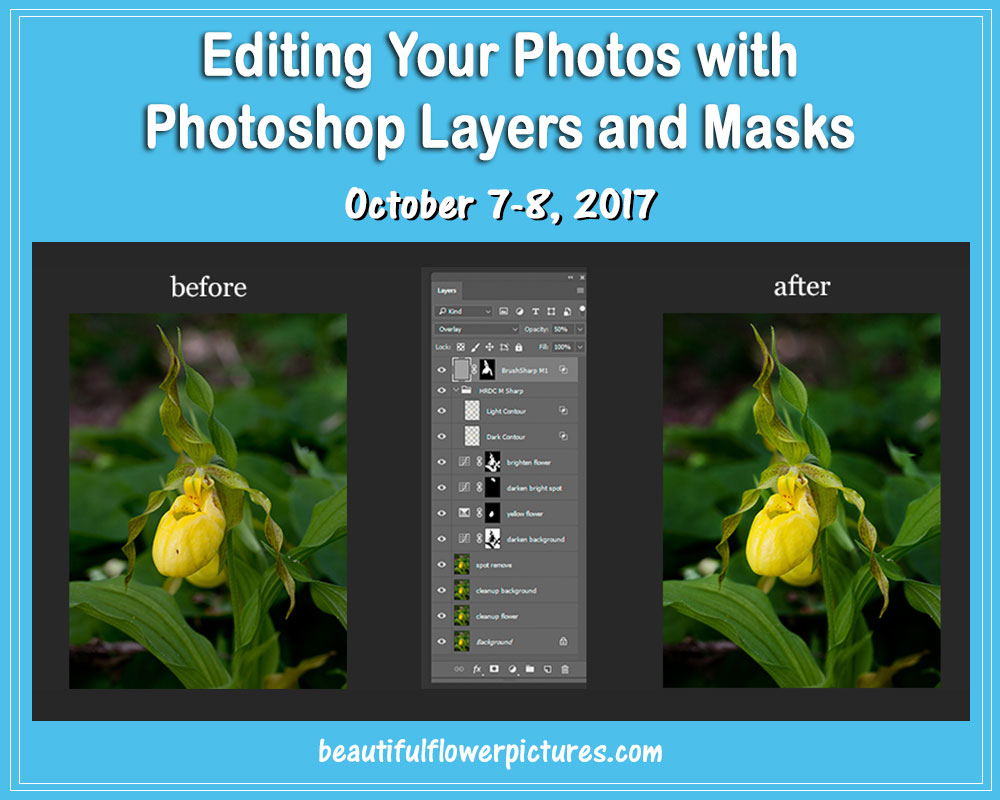
We’ll be teaching our Editing Your Photos with Photoshop Layers and Masks workshop on October 7-8. This workshop is designed for people with basic knowledge of Photoshop. We’ll be focusing on the how to use the powerful Layers and Masks in Photoshop to do more complex editing of your photos. Your can read more about our Photoshop workshop at http://beautifulflowerpictures.com/photoshop-layers-masks-workshop-2017/
If you have any questions about either workshop, drop me a note and we’ll find a time to talk about if either workshop is right for you. We’d love to have you join us for one of our photo editing workshops this fall
by hankinslawrenceimages | Apr 21, 2017 | Photo Tips, Workshops
A while back, I shared an article about Working the Scene where I talked about trying different compositions when you’re in the field photographing the landscape. Since then, I’ve gotten a few questions asking if I do the same thing when photographing flowers. And the answer is yes.
I do the same three things photographing a flower at a garden as I do when I’m photographing a landscape.
- Try different focal lengths. If you’re looking through a telephoto lens, you will get very different compositions then when you are using a wide angle lens. I often start with a wide angle lens, and then pull out my macro lens. Sometimes I’ll even pull out a longer telephoto lens if that’s what I need to get the photo I want.
- Try portrait and landscape compositions. The change from horizontal to vertical orientation of your camera will force you to include and exclude different parts of the scene, and will help you to think about the scene in different ways.
- Move around and try again. When I first see a flower or group of flowers I want to photograph, I usually see what I think is the perfect image in my mind. So I’ll set up my tripod and grab the lens I need, and create that photo. Then I’ll take a moment and review the image on the back of my camera to see if it’s what I want and more importantly, is it the best image I can create. If not, I’ll take another look at my subject and see if there is composition I like better, move my tripod, reassess my lens choice and take that photo. Re-evaluate and set up another shot if I still don’t have what I want. Most of the time I’ll create 4 or 5 very different compositions of a specific flower or group of flowers before deciding that I’ve what I’m looking for. Moving my tripod up or down, a few inches to the left or to the right can make all the difference in the world.
Here are some of my photos of a bleeding heart plant I took several years ago that illustrate how I work a scene with flowers
One photo I took was of the whole bleeding heart plant in front of a tree trunk and wall. Decided it was too busy and didn’t really show off the heart shaped flowers.
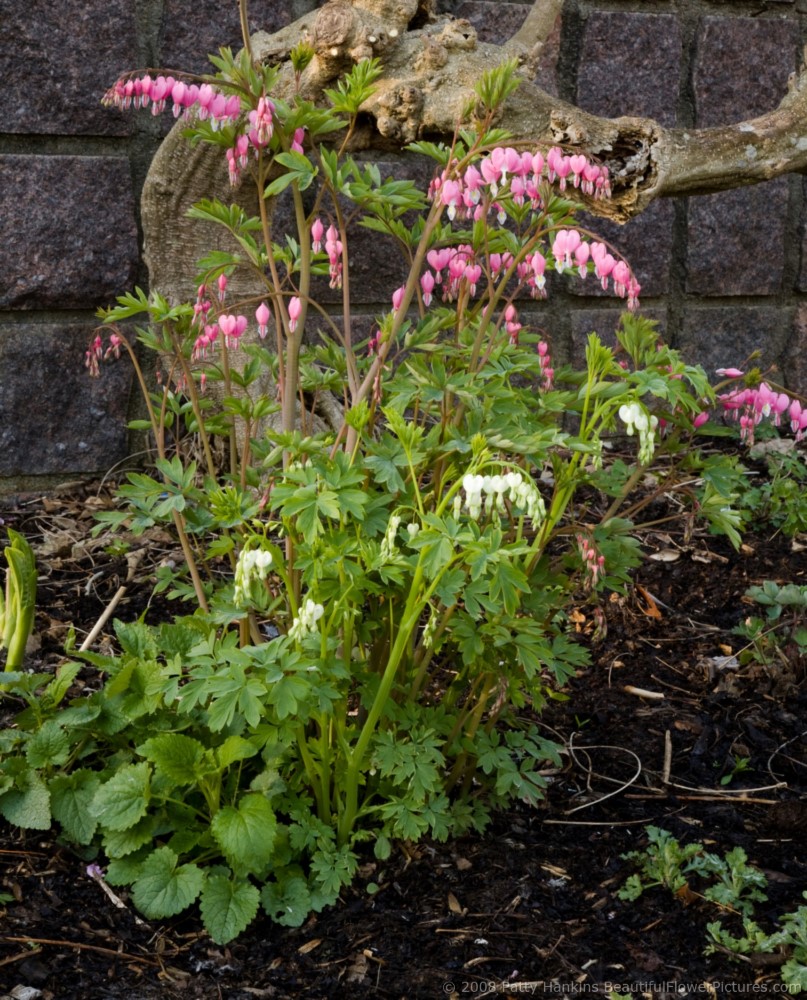
Bleeding Hearts © 2008 Patty Hankins
So I moved in closer to just included a few of the branches. I also changed my aperture so that the wall and tree trunk were no longer in sharp focus. Still not right.
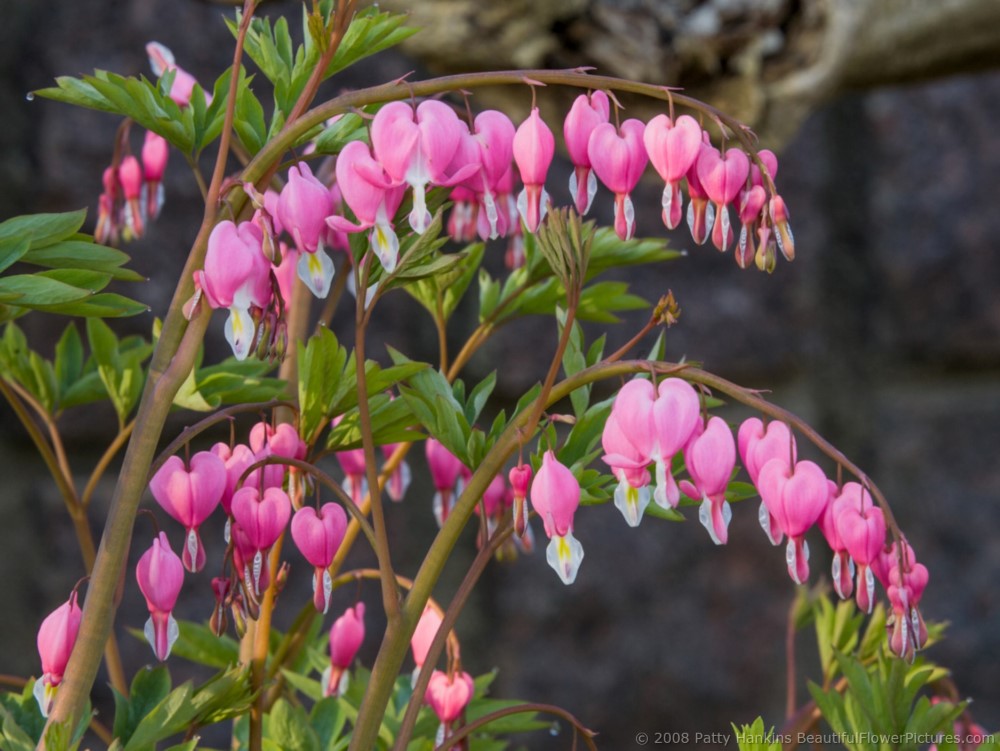
Bleeding Hearts © 2008 Patty Hankins
So next I moved my tripod around to another side of the plant, framed up just one branch of blossoms with a very shallow depth of field so only one flower was in sharp focus. Still not right.
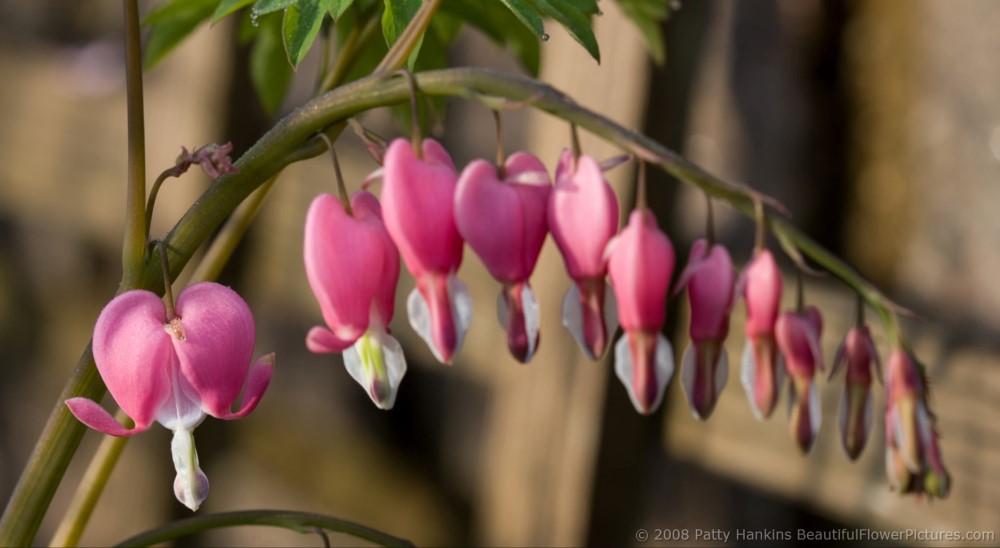
Bleeding Hearts © 2008 Patty Hankins
So I switched to portrait orientation and moved in closer so I only had a few flowers in my photo. I also switched to my macro lens. Just didn’t like the light wood background or that the flowers in the upper right were in front of the main subject and out of focus. Still not right.
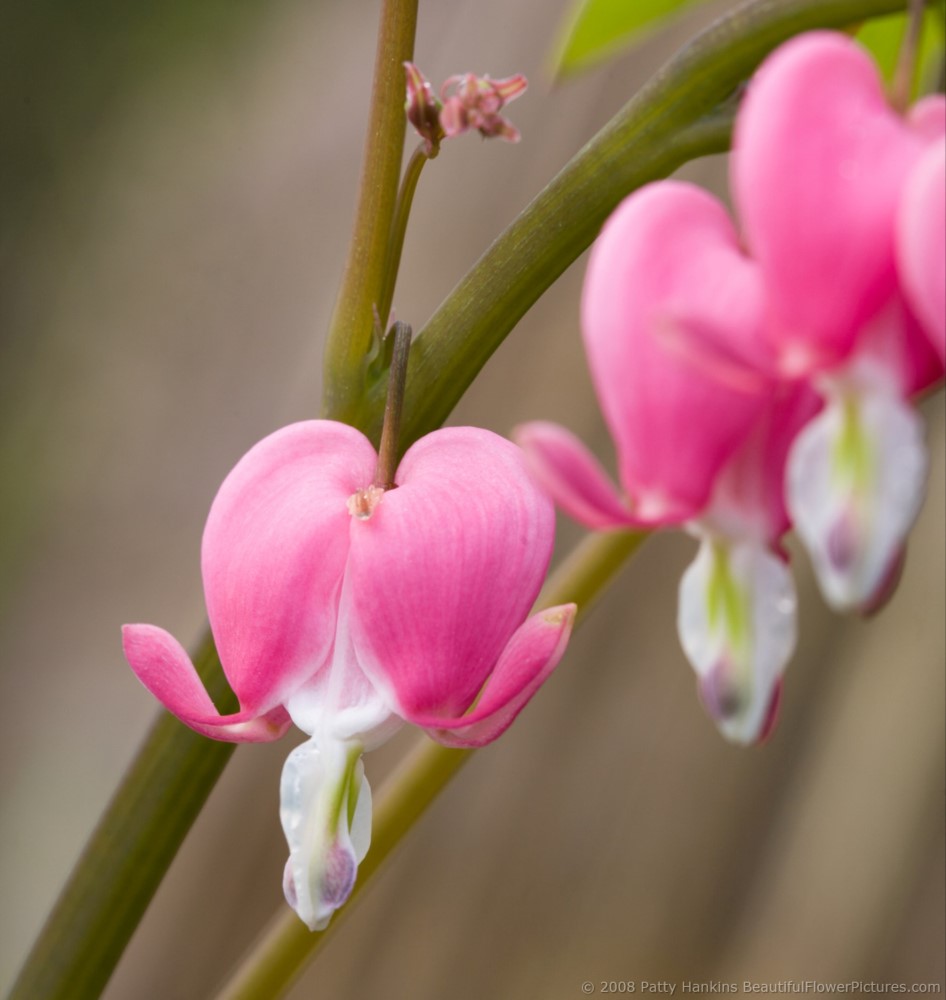
Bleeding Hearts © 2008 Patty Hankins
So I moved my tripod again so that the flowers were backed by green leaves instead of the brown wood and that I was further away from the bleeding hearts. This gave me the opportunity for a wider angle photo showing an entire branch of the flowers including the buds at the end. Better – but still not quite what I wanted.
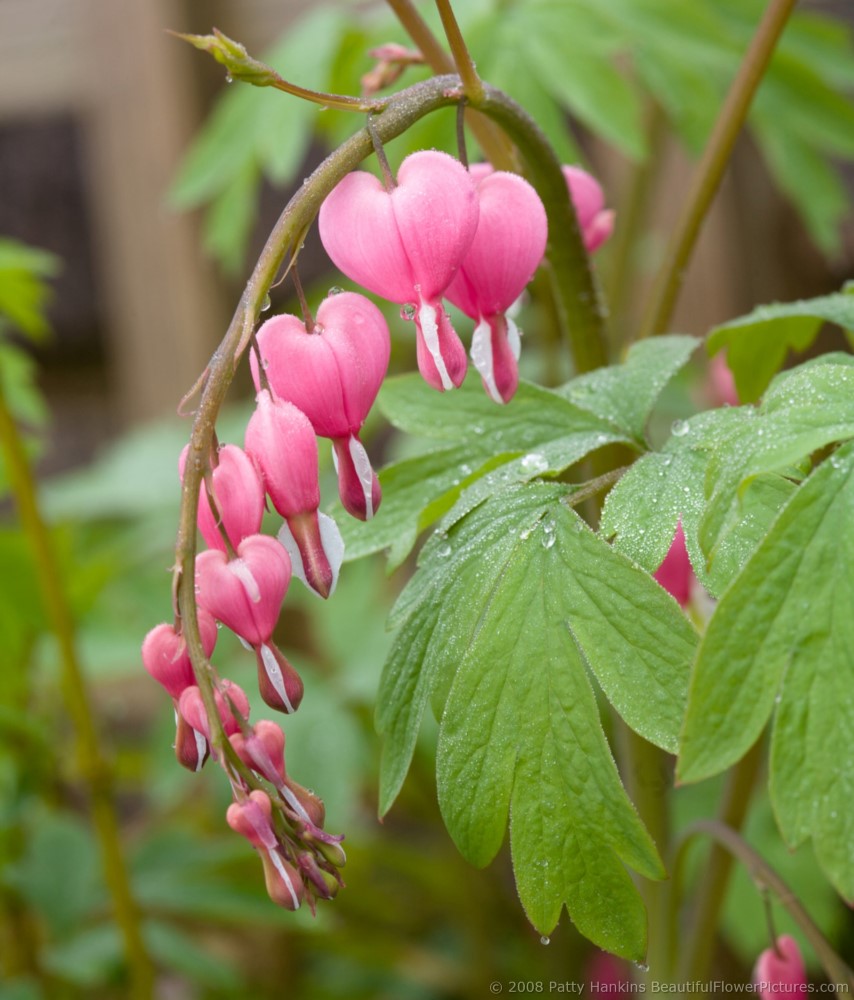
Bleeding Hearts © 2008 Patty Hankins
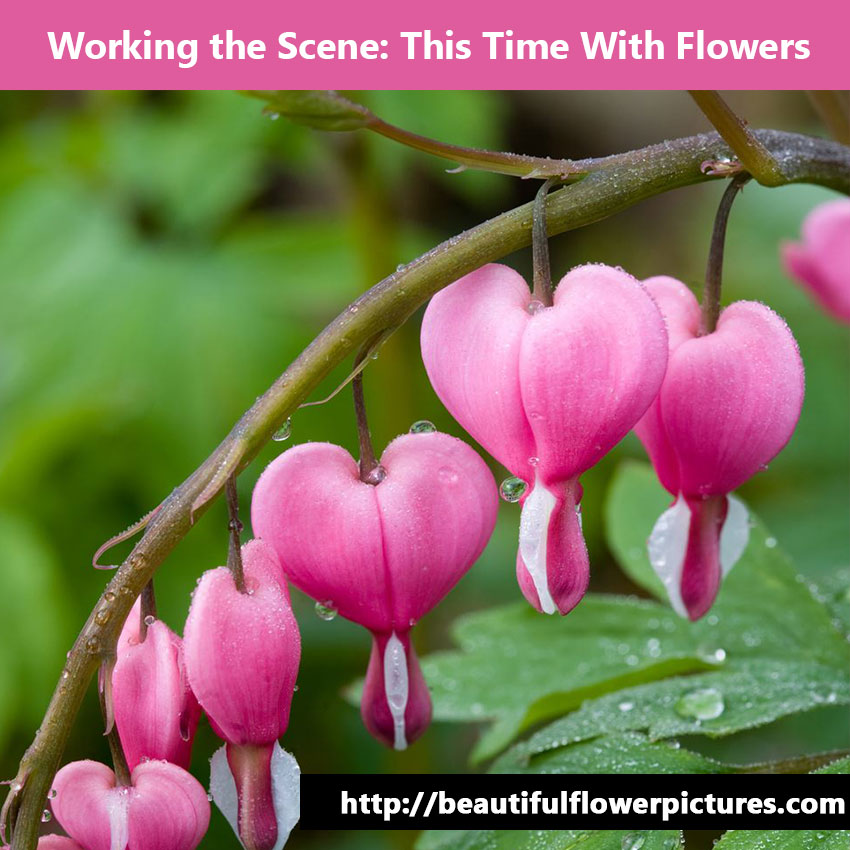
So I moved my tripod one more time – this time in a little closer and switched back to landscape orientation knowing I’d crop to a square for the final photo. I focused in on just a few of the heart shaped blossoms, made sure the water droplets were in sharp focus, and that the branch would act as a leading line to draw your eye through the photo. Finally I had my photo – and this has been one of my best selling photos over the years.
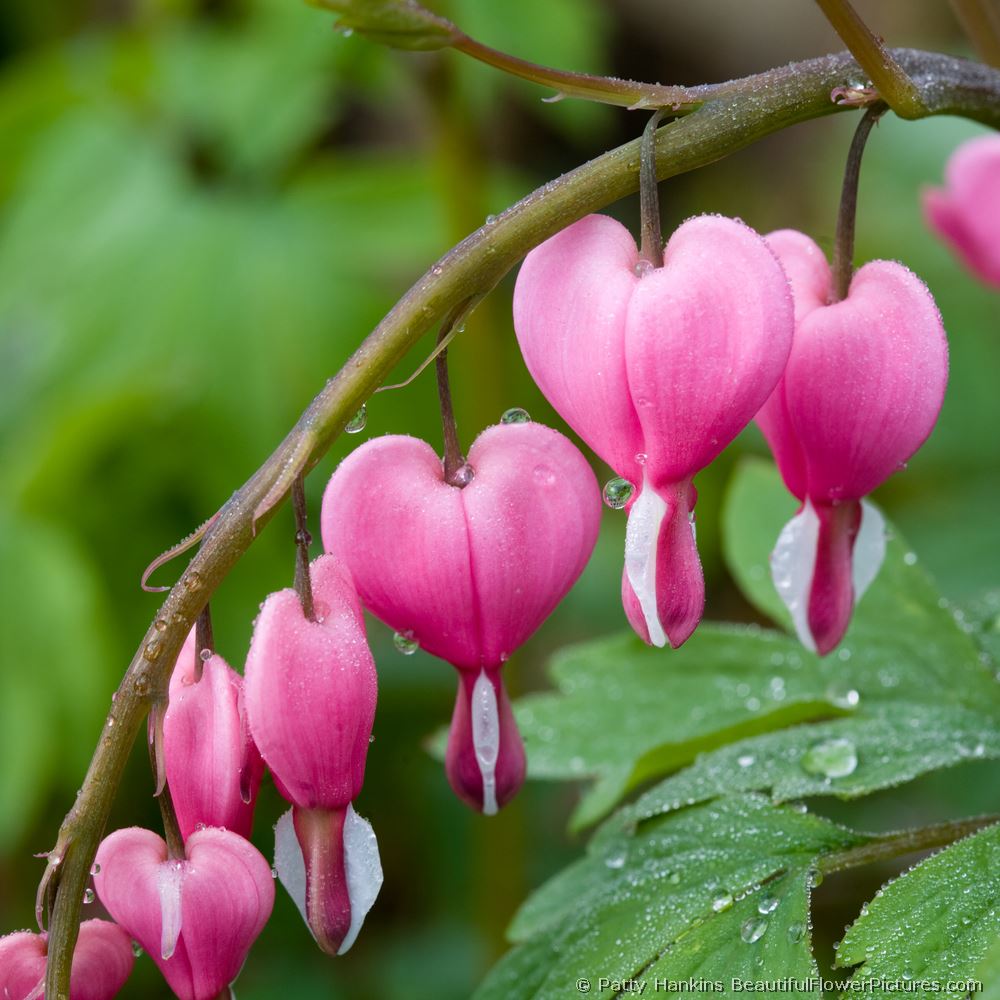
Bleeding Hearts © 2008 Patty Hankins
And if you are photographing at a botanical garden there’s one more photo you really should take when you are working the scene – a photo of the identification sign so you know what flower you’ve been photographing.
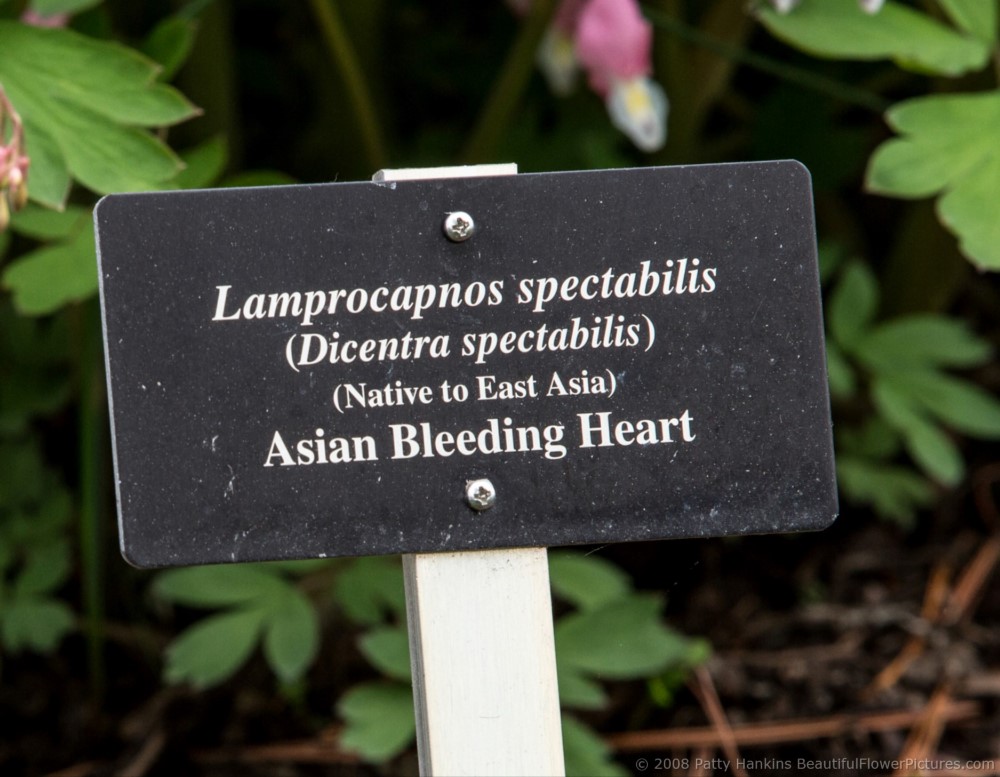
Bleeding Hearts © 2008 Patty Hankins
Working the scene is one of the ideas we’ll be talking about and practicing during my May 15-20 workshop – Photographing the Gardens of Philadelphia workshop and during my Morning on the Lavender Farm workshops.
All the details about the workshop and registration information for the workshops is at http://beautifulflowerpictures.com/photographing-gardens-philadelphia/ and http://beautifulflowerpictures.com/morning-lavender-farm-workshops/
Not sure if one of these workshops is right for you? Drop me an email and we can find a time to talk.
by hankinslawrenceimages | Mar 31, 2017 | Photo Tips, Workshops
Spring flowers are finally blooming here in the DC area. Enough cherry blossoms survived last week’s winter weather to bloom beautifully at the Tidal Basin. Wildflowers are starting to bloom at local parks. And it won’t be long until the tulips are blooming at local gardens.
Since for many photographers, spring means it’s time to get the camera out after spending the winter on a shelf, I thought I’d share an article from last year with you today about taking close up photos of flowers.
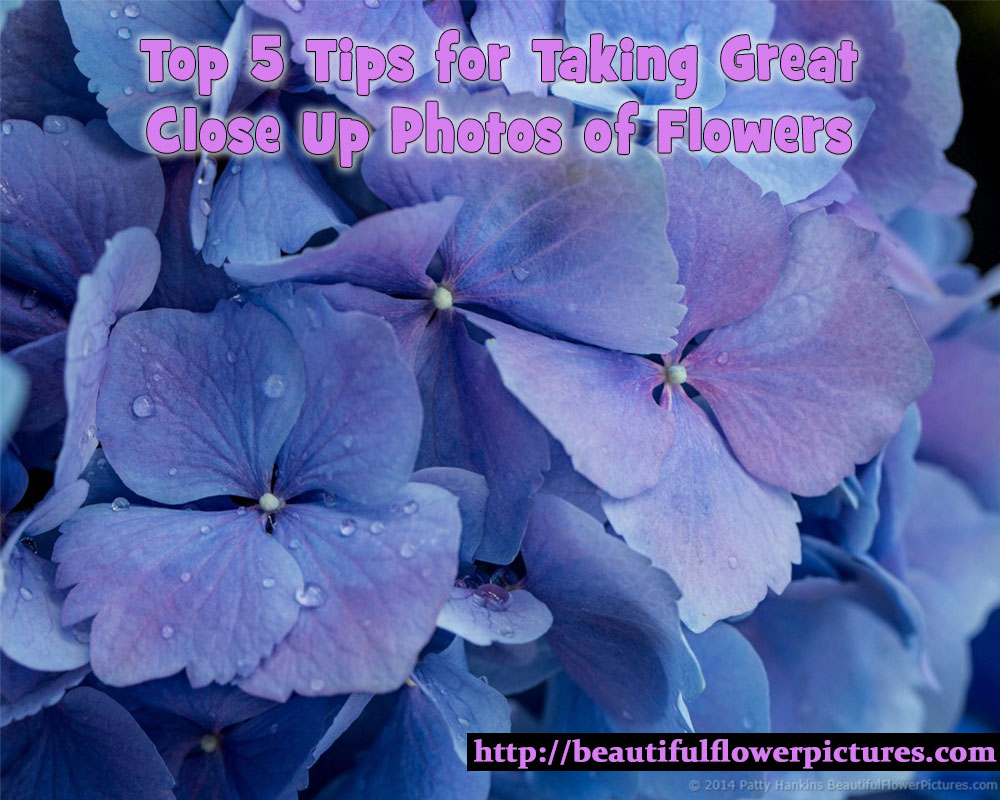
Spring is in full bloom here in the Washington DC area – even if we are having a bit of a cold spell this week. I can still see a few cherry blossoms on the tree in my front yard, the Virginia Bluebells are blooming at local parks and tulips are blooming at local gardens. As I’m photographing flowers on almost a daily basis, I’m noticing that I’m taking many more close up photos of flowers than I have in the past – especially when I’m in my studio. Many of the photos show only part of a flower — not even a whole blossom. The close up photos have gotten a great response from people who have seen them — and lots of questions about how I take them. So I thought I’d share a few tips on taking great close up photos of flower with you today.
1. Think about What Caught Your Eye: Before you click the shutter, think about what it is about the flower that caught your eye and made you want to photograph it. Was it the color, the shape, the dewdrops or the way light is striking the flower? Now compose your photos to highlight what caught your eye.
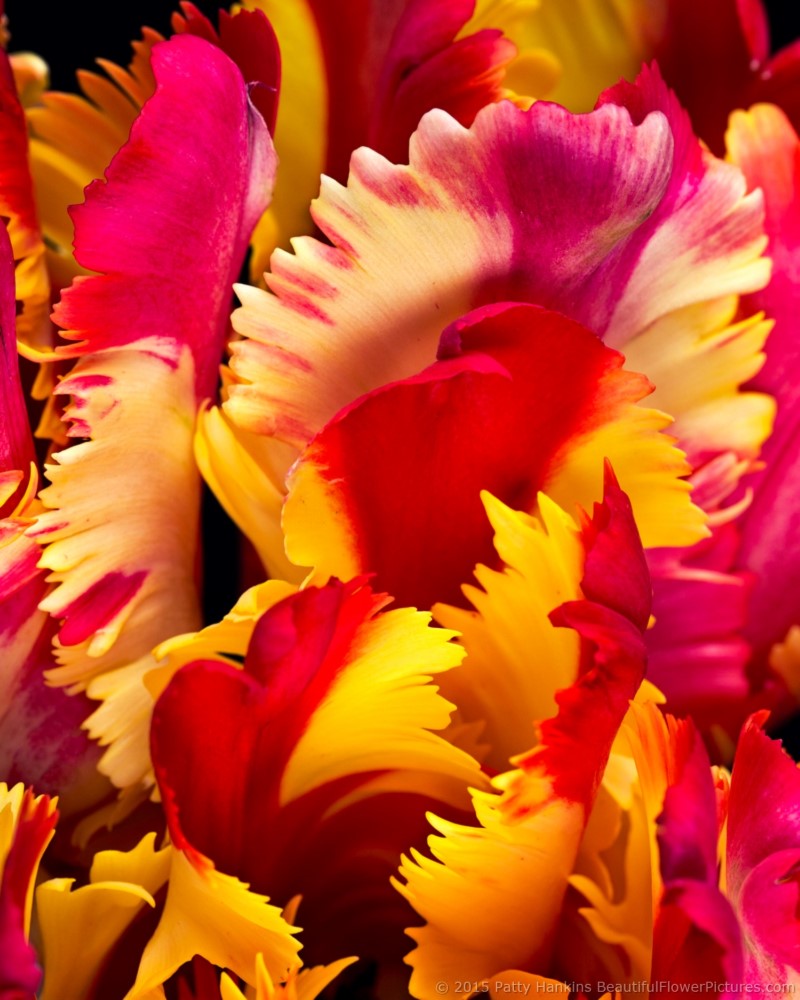
Petals of a Flaming Parrot Tulip © 2015 Patty Hankins
2. Use a Macro Lens (or Macro Setting on Your Camera) For close up photos you want to be able to get as close to your subject as possible. Macro lenses or the Macro Setting on your camera (often symbolized by a little flower) allow you to get much closer to a subject and still have it in focus than using either a non-macro lens or setting
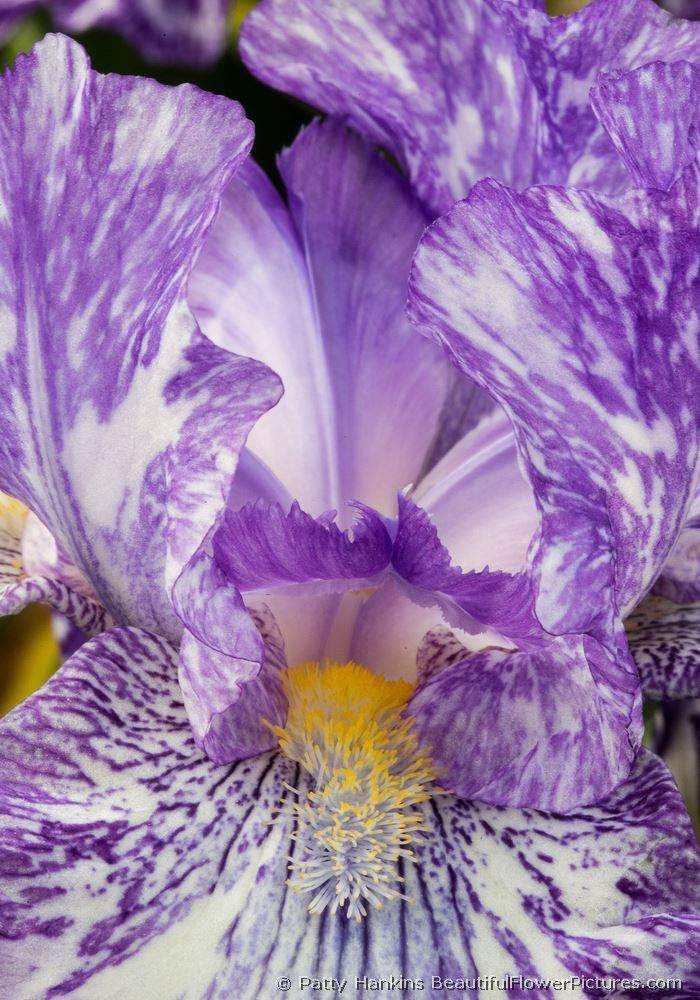
Purple Streaker Iris © 2013 Patty Hankins
3. Use a Tripod.I know — we live in an age of image stabilization/vibration reduction cameras and lenses, to say nothing of high ISO cameras so we can get faster shutter speeds — so a lot of the time we can get away with not using a tripod. But when it comes to close up photos I really recommend using one. When you are focused in on a very small area, the slightest motion of the camera (including that caused by clicking the shutter button) can introduce motion blur and lack of clarity in your focus. So if you want to take really crisp clear close up photos — use a tripod
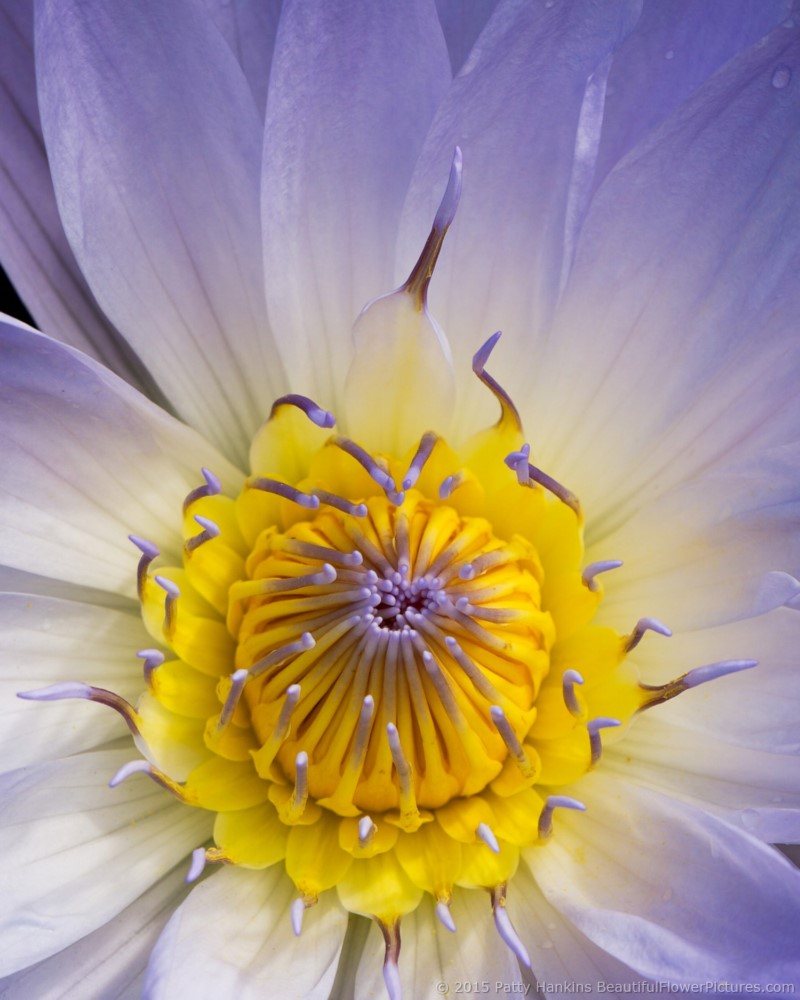
Bob Trickett Water Lily © 2015 Patty Hankins
4. Try Different CompositionsDon’t photograph the flower from just one angle. Move around and see what else you see. Try taking photos of the center of the flower, or the petals, or just one specific detail. If you’re photographing with a digital camera there is basicly no additional cost to taking more than one photo of a scene. So go ahead — try different compositions. Who knows — you may discover you like the petals of the flower better than the center!
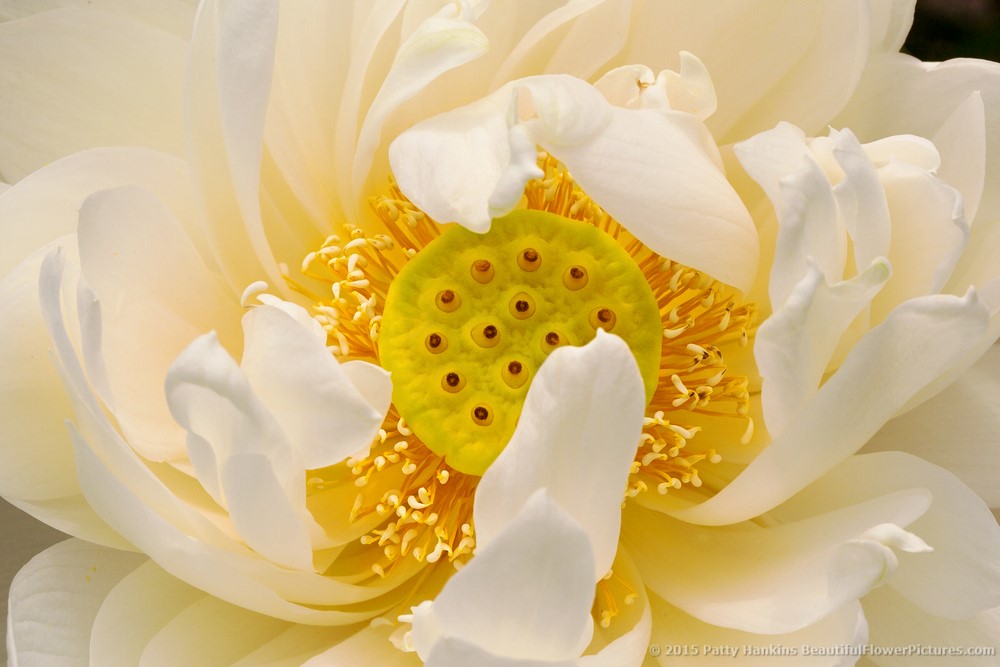
White Lotus © 2015 Patty Hankins
5. Try Different AperturesIf you are photographing in Aperture priority, try changing the aperture (f-stop) you’re using and see what this does to your photo. You may be surprised to find that sometimes a narrow depth of field gives you the look you want — and at other times, a larger depth of field is perfect for what you’re trying to show in the photo
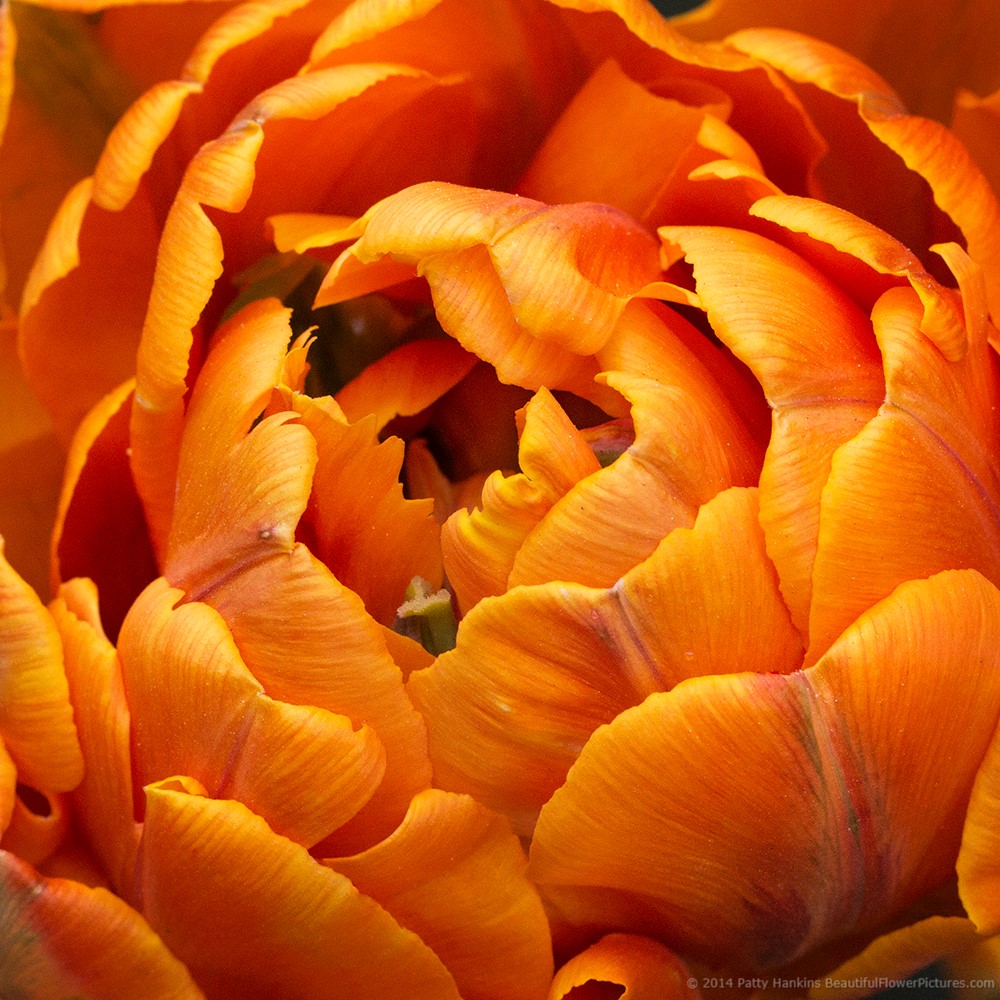
Orange Princess Tulip © 2014 Patty Hankins
Bonus Tip: Have Fun! Have fun while you’re photographing. Don’t forget to slow down and take few moments to appreciate the beauty of nature around you.
If you found these tips helpful – consider joining me for either of my spring flower photography workshops. Early Bird Registration for my May workshop ends today
May 15 – 20 – Photographing the Gardens of Philadelphia: http://beautifulflowerpictures.com/photographing-gardens-philadelphia/
June 9 – 11 – Photographing Flowers (Without Swearing at Your Camera) in the DC area: http://beautifulflowerpictures.com/photographing-flowers-without-swearing-2017/
If you have any questions about either workshop, just drop me a note and we’ll find a time to talk.
by hankinslawrenceimages | Mar 17, 2017 | Photo Tips
I recently got an email from a novice photographer commenting on how they liked that in some of my photos just one flower is in focus – and in others – everything is in focus. And they wanted to know how I got my photos to look like that. Did they need Photoshop or was there another photo editing software package that they could use?
I replied that I set my camera in Aperture Priority, and chose my F-stop based on how I wanted my photo to look – and what part of the photo I wanted to be in sharp focus.
The response I got did surprise me – they replied that it sounded challenging to do it in the field – wouldn’t it really be easier to do it in software?
At least for me, the answer to that question is NO. I would much rather think about what I want my final photo to look like when I’m in the field and do my best to capture it on my camera than to try to fix it in Photoshop later.
When I’m photographing flowers, I tend to set my camera in Aperture Priority Mode. This allows me to choose my F-Stop which lets me control the depth of field – or how much of the photo is in sharp focus.
The lower the number of the F-Stop (such as f 2.8) the wider open the aperture in the lens is – and the smaller the area in sharp focus is. Similarly – the larger the number of the F-Stop (such as F 32), the aperture opening in the lens will be smaller and the area in sharp focus will be much larger.
As just words – that really doesn’t make much sense. It’s one of these things that is much easier to show you than to explain it.
Where the F-Stop numbers came from was back in the day of manual lenses – there were blades that opened and closed to control the amount of light. The aperture or opening was wide open at F 2.8 and closed down at F 32. These photos of one of Bill’s lenses for his large format camera shows the lens blades wide open and closed down.
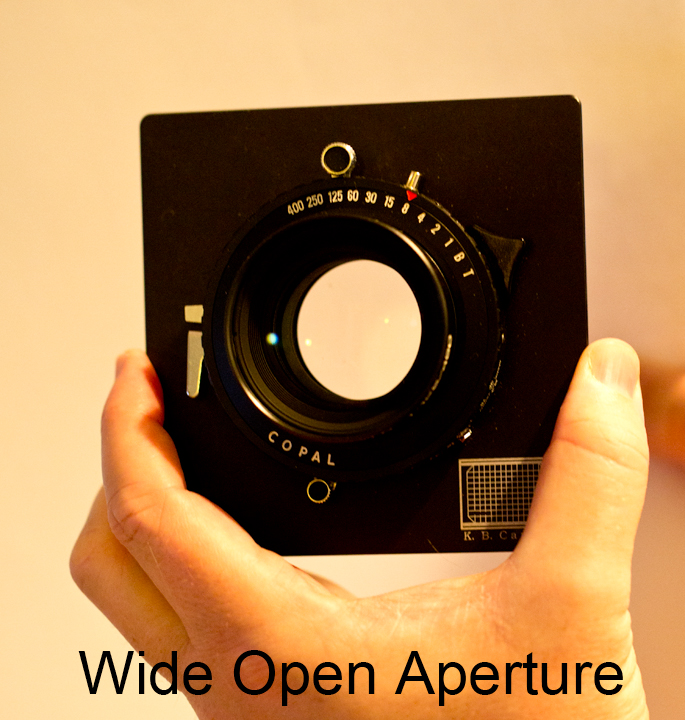
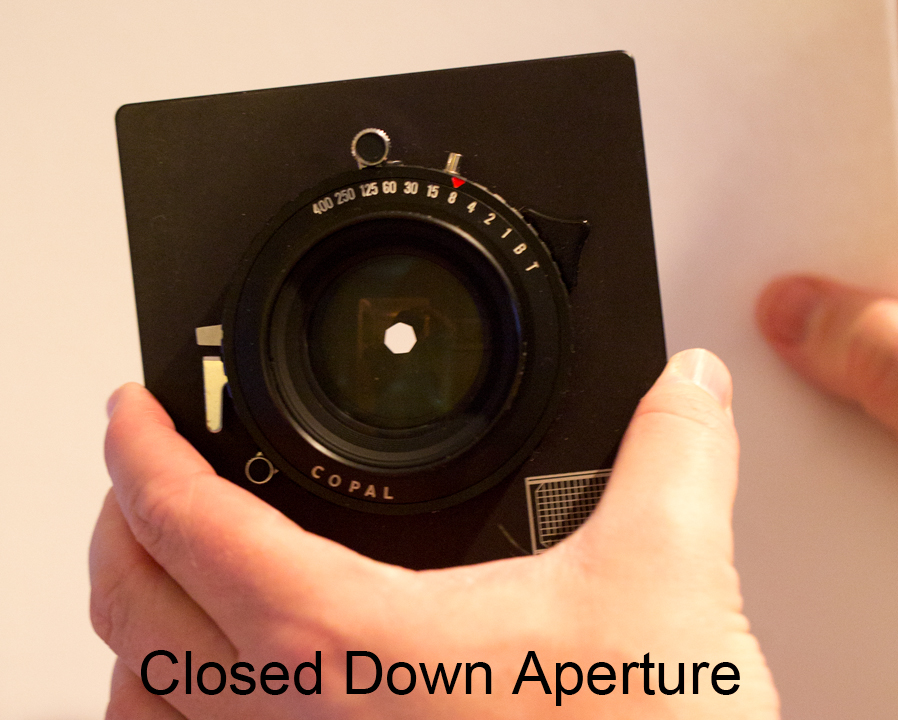
And to show how changing the F-Stop affects the look of your photo – I took a series of 8 photos of butterfly weed at F-Stops ranging from F 2.8 to F 32.
The first photo was taken at F 2.8 – a wide open aperture with a shallow depth of field. As you can see – just a few of the blossoms are in sharp focus and the rest of the photo is blurred.
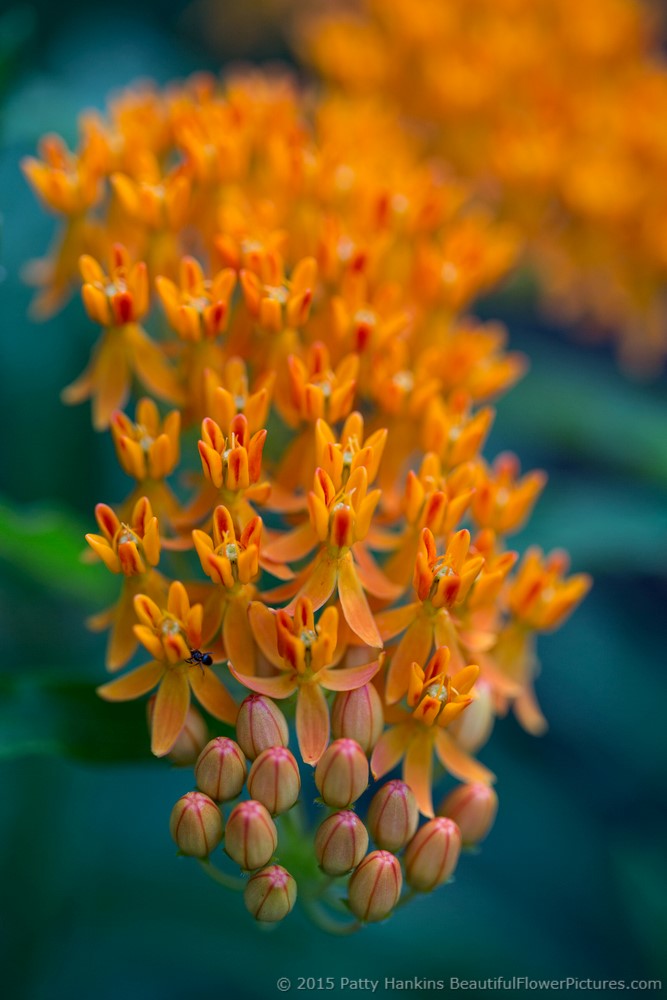
F 2.8
As you look through the next several photos – notice how many of the blossoms are in sharp focus and how much of the background you can clearly see.
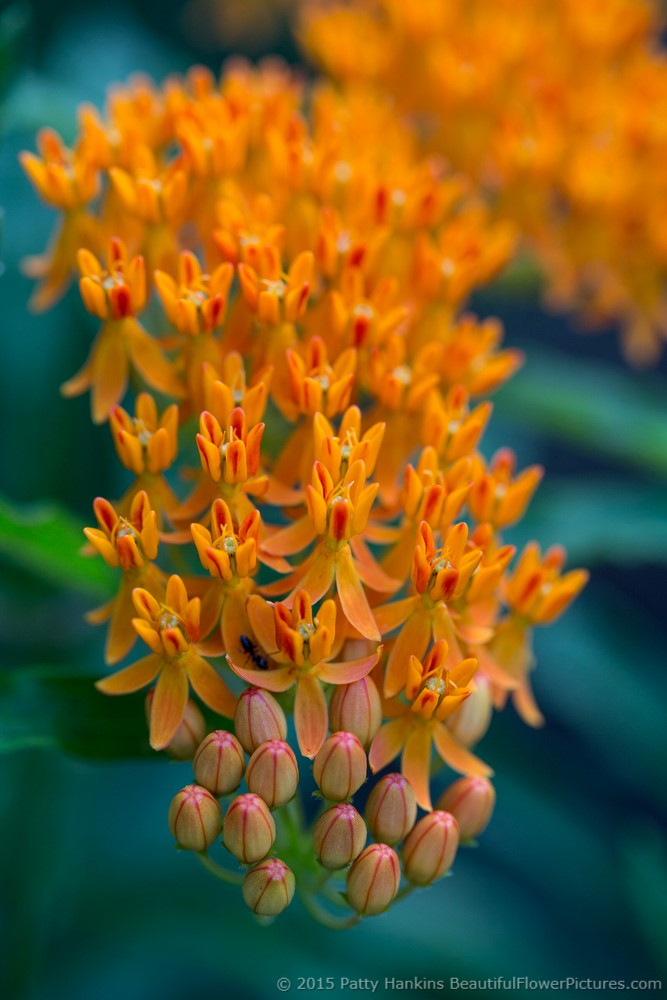
F 4
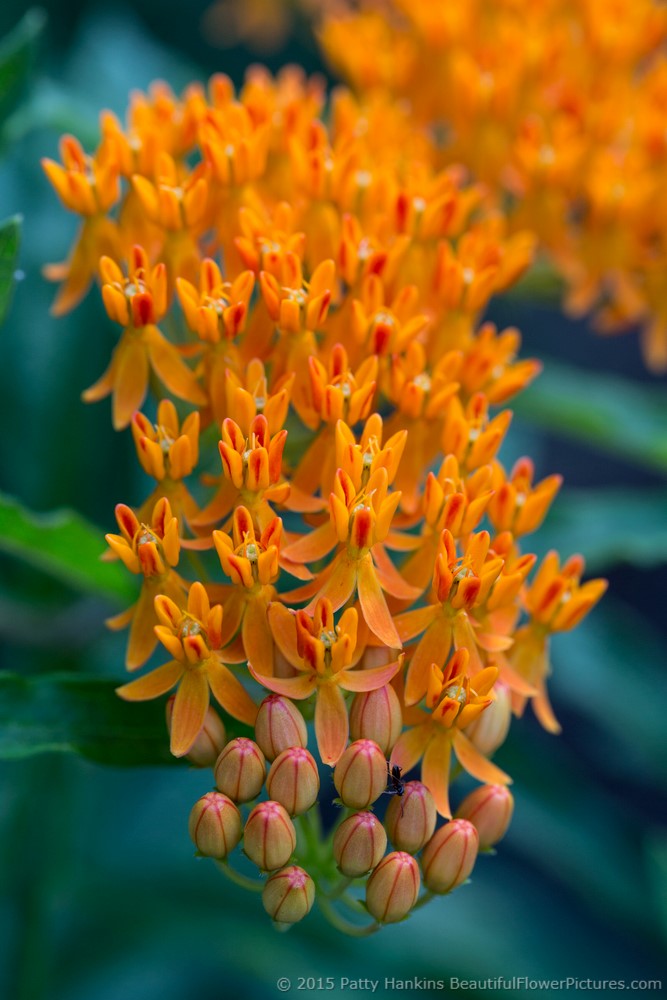
F 5.6
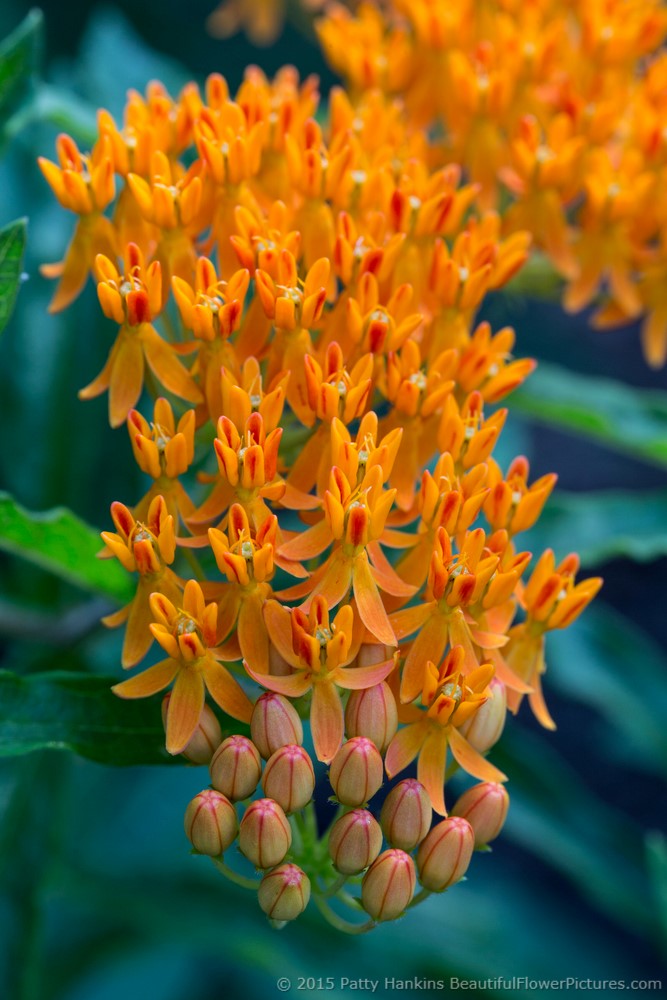
F 8
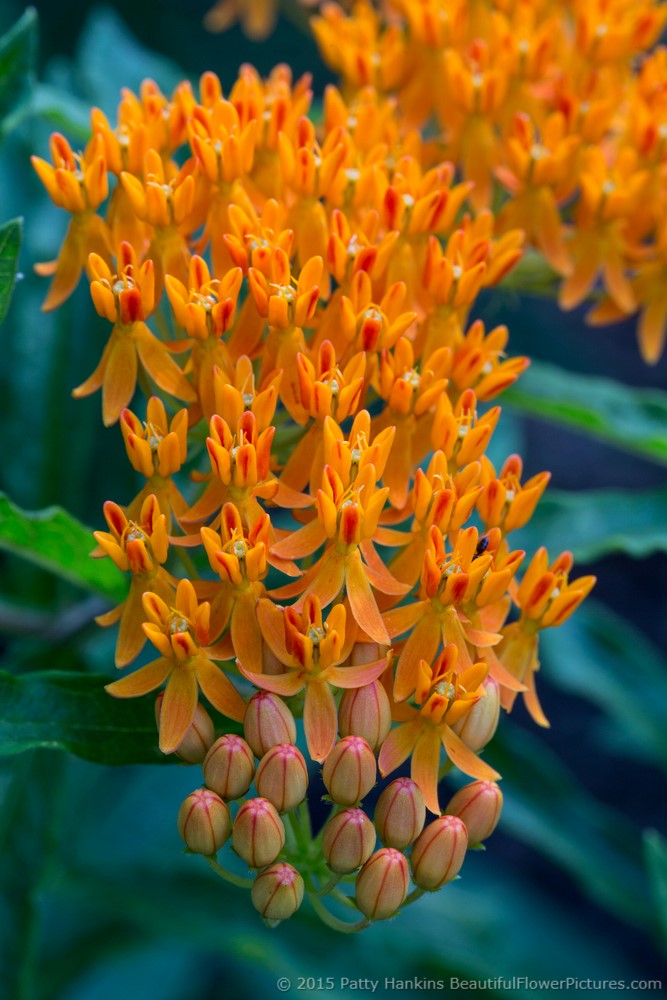
F 11
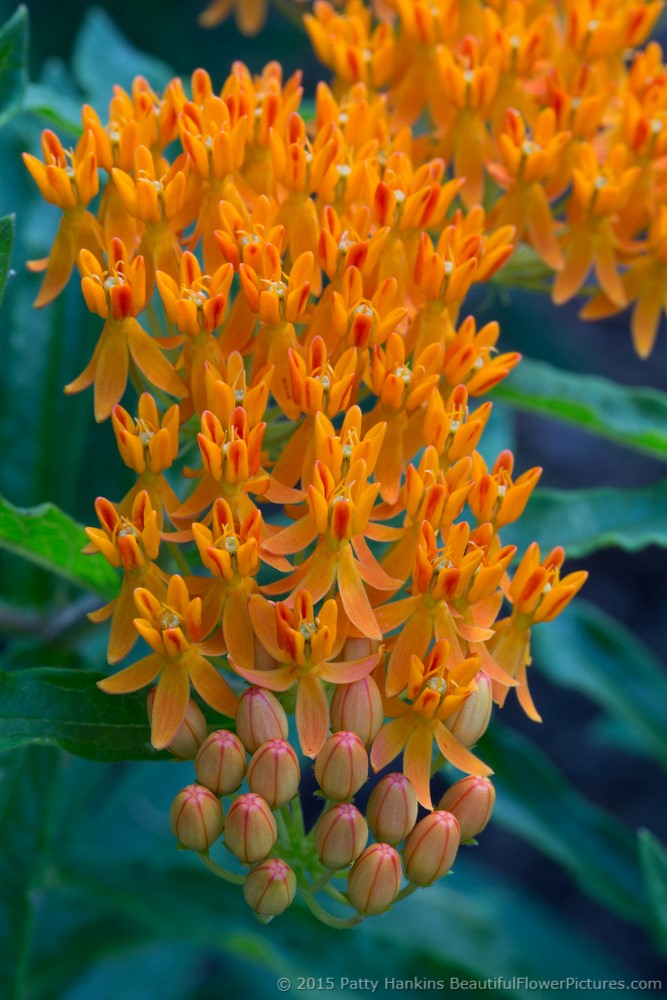
F 16
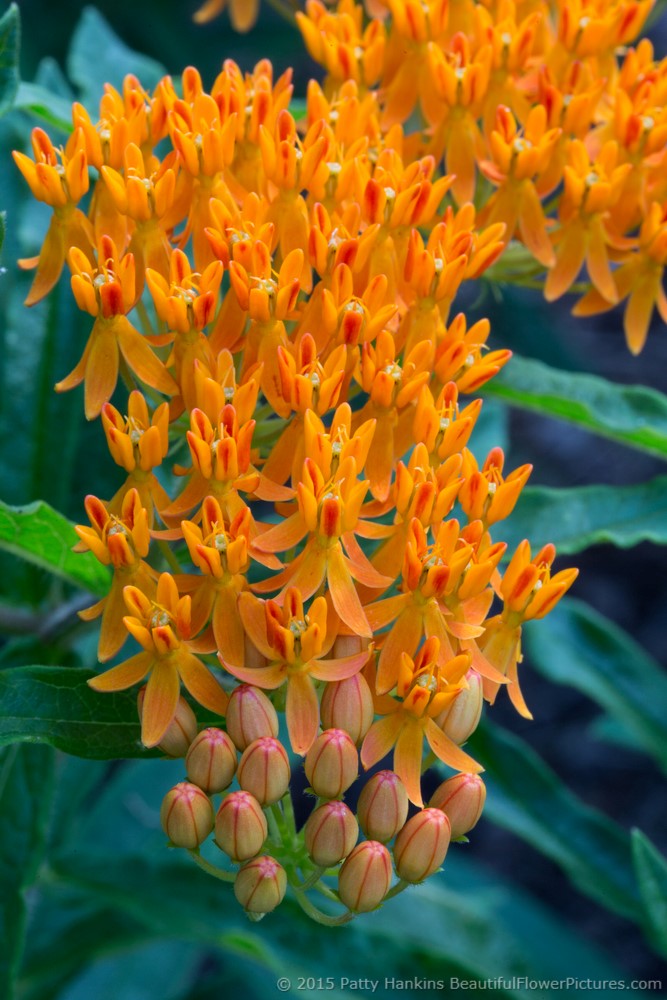
F 22
The last photo was taken at F 32 – a very narrow aperture with a large depth of field. Just about the entire photo is in sharp focus – everything from all the blossoms to the leaves in the background are clearly defined.
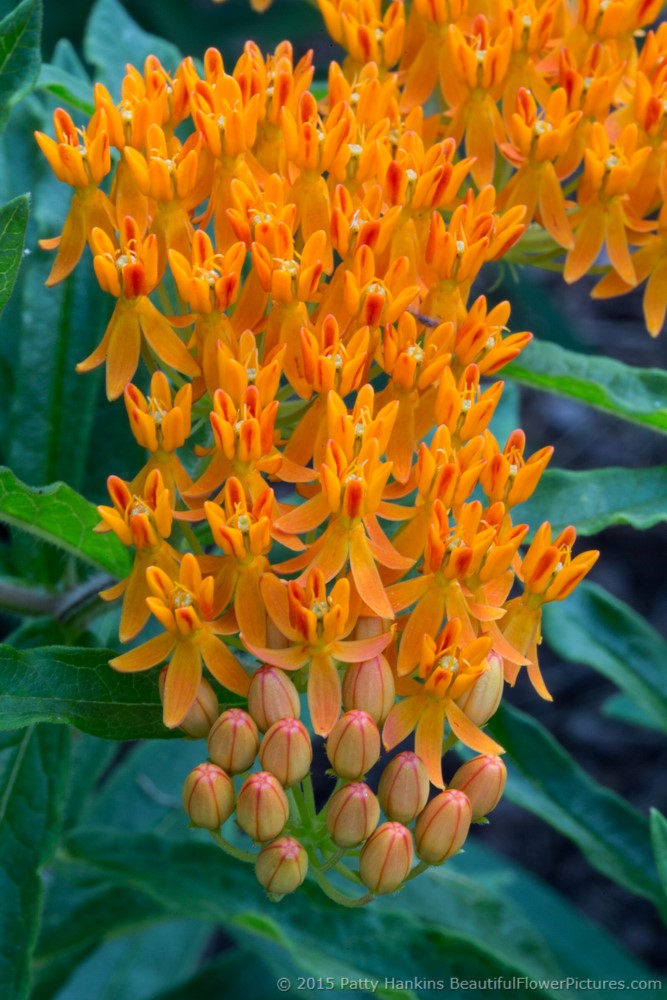
F 32
And what’s great is that you get to decide how much of your photo will be in sharp focus and what your final photo will look like – simply by choosing the F-Stop that lets you create the photo you want to share with the world.
Working with F-Stops and Depth of Field are some of the skills we work on in my flower photography workshops. If this is something you need help with, please join me for one of my spring workshops – Photographing the Gardens of Philadelphia on May 15 – 20 or Photographing Flowers (Without Swearing at Your Camera) in the DC area on June 9 – 11.
Photographing the Gardens of Philadelphia – http://beautifulflowerpictures.com/photographing-gardens-philadelphia/
Photographing Flowers (Without Swearing at Your Camera) – http://beautifulflowerpictures.com/photographing-flowers-without-swearing-201
If you have any questions about either of these workshops , just drop me a note and we’ll find time to talk.


